


THIS DAIRY AND SOY ALLERGY APPROVED DESSERT IS THE ULTIMATE SUNDAY FUNDAY INDULGENCE
Many people don’t know this, but the first few weeks (really month) of having our daughter was really tough, because she would cry hysterically and we didn’t know what the cause was. Is she fed?… check! Diaper changed?… check! Burped?… check! It seemed to be something with her digestive track and constant hiccups, burps or tummy ache. Well after many desperate attempts to make her feel better as new parents, our pediatrician referred us to an infant gastrointestinal specialist. When she first referred us, the first thing I thought was that I didn’t even know there was an occupation for something so specific. As I began to ask around and research more, I discovered many newborns come into the world with food allergies and that our dilemma was quite common.
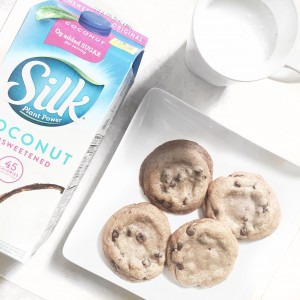
After discussing her symptoms and doing a thorough examination, the doctor determined our daughter is allergic to ALL soy and dairy in my diet at this time (meaning she will most likely grow out of it as her digestive track develops and matures – fewf). She told us that if I wanted to continue to breastfeed, I would have to eliminate ALL soy and dairy out of my diet and read allergy labels religiously. This is not exactly a soy latte, Luna Bar, cookie dough fro yo addict’s dream to hear… “Ummm, excuse me?! …eliminate what?!!” After the initial thought to consider switching to formula, my husband and I started to look into the health benefits of breast milk even more and what this would really mean for my day-to-day diet and overall lifestyle, so we could determine if it could be maintained in a realistic way. After reflecting on the news and discussing these big changes together, we decided we wanted to stick with nursing – or at least give this new lifestyle our best shot and not give up quite yet. I told my husband I was up for the challenge and chose to eliminate ALL soy and dairy in my diet cold-turkey right at that moment (…well, right after finishing my last sip of that sweet, foamy Starbucks soy latte we got on the way over hehe I told you I was an addict ;).
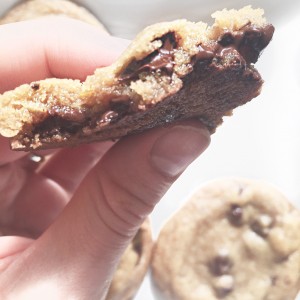
Fast forward 4 weeks later and after completely replacing all my favorite items in my diet with dairy-free, soy-free versions and practically living at Whole Foods, spending what seemed like a small fortune for a couple of brown paper bags filled with goodies, I barely recognized my daily diet and really missed some of my favorite indulgences! As a new mommy, while you are looking to get back to tip-top shape as soon as possible, those late nights and the whole new lifestyle of having a little one definitely makes you want to reach for some yummy comfort food at times, but unfortunately my options were pretty limited – especially in the dessert department! While I found some so-called allergy friendly “desserts” at Whole Foods, they just didn’t compare. Even though I, of course, wanted what was best for our daughter, I started questioning how long I could really maintain this major lifestyle change in my diet without ever being able to splurge or look forward to any real desserts! I mean, I would do anything for our daughter, but food is a very important part of life and without being able to go out to restaurants or do takeout (since soy and dairy is in practically everything) or enjoy the normal foods you look forward to, the transition can send your whole world for a whirlwind. Where I’ve always been somewhat of a health-nut foodie who loves to indulge, I remember feeling so bored by food and didn’t really have anything I could look forward to…that was until I discovered these amazing allergy-friendly coconut oil chocolate chip cookies!!!
How did I discover these you ask? Well, my whole family all knowing I LOVE dessert, knew this was going to be a challenge for me. So, my mother-in-law who is an awesome baker and extremely thoughtful surprised me with this dairy-free, soy-free recipe for Coconut Oil (dark) Chocolate Chip Cookies and guys THESE. ARE. AMAZING!!! I’m not kidding, like gooey, sweetness, change-your-life kind of amazing! One caviot though – ya gotta like dark chocolate and of course coconut, both of which I love so I had no problem there. She found this awesome recipe on another fellow blogger’s site. So to support this Blogger (gotta support our fellow trubeautys), I’m going to include the recipe below, along with a direct link to the exact page on her Blog, so you can download and print for yourself. Keep in mind, we adjusted a couple things from the printout so I will mark the allergy-friendly adjustments with three *** bolded below, so you can be sure to take note! Enjoy trubeautys and remember allergy or not, along with having fitness goals ya gotta enjoy life, so live it up and let go sometimes especially on Sunday Funday 🙂
Until next time, namaste-BEYOUtiful xo! Heath
COCONUT OIL CHOCOLATE CHIP COOKIES From fellow Blogger GimmeSomeOven.com!
CLICK HERE for printable recipe
These coconut oil chocolate chip cookies are thick, chewy, soft, chocolate-y, and absolutely delicious!
PREP TIME: 15 MINS + 2 HOURS REFRIGERATED COOK TIME: 10 MINS TOTAL TIME: 25 MINS
INGREDIENTS:
1/2 cup coconut oil, softened but not melted ***Semi-Solid Coconut Oil
1/2 cup brown sugar, packed
1/3 cup granulated sugar
1 egg
2 teaspoons vanilla extract
1 1/2 cup all-purpose flour
2 teaspoons cornstarch
1 teaspoon baking soda
1/4 teaspoon salt
1 cup semisweet chocolate chips ***USED “NJOY LIFE” brand ALLERGY-FRIENDLY DARK CHOCOLATE CHIPS
DIRECTIONS:
In the bowl of a stand mixer, use the paddle attachment to cream together the softened coconut oil, sugars, egg, and vanilla extract on medium-high speed until light and fluffy, about 3 minutes.
Add in the flour, cornstarch, baking soda and salt, and beat on medium-low speed until combined. Fold in (stir in) the chocolate chips by hand until just combined.
Use a large cookie scoop (equivalent to 3 tablespoons) or a spoon to shape the dough into balls, and place them on a large plate. Cover with plastic wrap and chill the dough balls for at least 2 hours.
When you are ready to bake the cookies, preheat oven to 350 degrees F. Place chilled dough balls at least 2 inches apart on a parchment-lined baking sheet. (Or a baking sheet that has been covered with a Silpat, or greased with cooking spray.)
Bake for 10-12 minutes until the edges are just set. The centers may look slightly undercooked. Cool cookies on the baking sheet for about 5 minutes, then transfer to a wire rack to finish cooling. Serve immediately or store in a sealed container for up to 1 week. You can also freeze the cookies for up to 3-4 months.